Showing posts with label website. Show all posts

Wednesday, 24 October 2018

How to Setup NGINX Web Server in an iocage Jail on FreeNAS 11.1

بسم الله الرحمن الرحيم


Abstract


Tutorial on how to setup NGINX Web Server with PHP72 in an iocage Jail on FreeNAS 11.1.


Assumptions and Prerequisites


  • OS: FreeNAS 11.1-U6
  • FreeNAS Host: fn
  • FreeNAS Network Interface: igb0
  • FreeNAS IP: 10.0.0.2
  • FreeNAS Subnet Mask: 24
  • Jail Container: iocage
  • iocage Version: 1.0 Alpha
  • Jail Release: 11.1-RELEASE
  • Jail Name: test
  • Jail Network Interface: vnet0
  • Jail Network Config: DHCP
  • Jail Default Route: 10.0.0.1
  • IP Version: IPv4
  • Bridge Network Interface: bridge0
  • DNS 1: 10.0.0.1 
  • Domain: example.com
  • ZPool Volume: tank
  • NGINX Version: 1.14.0_12
  • Web Directory: /usr/local/www/html
  • PHP Version: 7.2
  • Certificate File Name and Location: /usl/local/etc/ssl/test.crt
  • Certificate Key File Name and Location: /usr/local/etc/ssl/test.key
  • Setup iocage Jail

NGINX


Install NGINX
root@test:~ # pkg install nginx

Install Output


Enable NGINX to start on boot
root@test:~ # sysrc nginx_enable="yes"

Start NGINX Server
root@test:~ # service nginx start

Check to see what ports NGINX is listening on
root@test:~ # sockstat -4 -6 | grep nginx
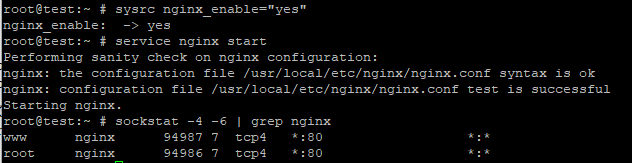

NGINX Running Success


NGINX Loads Default Page


PHP72


Install PHP72
root@test:~ # pkg install php72 php72-extensions

Create Web Directory
root@test:~ # mkdir -p /usr/local/www/html

Edit NGINX main configuration file to set php as server side script
root@test:~ # ee /usr/local/etc/nginx/nginx.conf

. . . . . . . . . . . . 
02: user www;
. . . . . . . . . . . . 
42: server_name  test;
. . . . . . . . . . . .
49: root   /usr/local/www/html;
50: index  index.php index.html index.htm;
. . . . . . . . . . . . 
70: location ~ \.php$ { 
71:     root                  /usr/local/www/html;                                                                             
72:     fastcgi_pass    127.0.0.1:9000;                                                                                 
73:     fastcgi_index  index.php;                                                                                      
74:     fastcgi_param SCRIPT_FILENAME $request_filename;
75:     include            fastcgi_params;                                                                                 
76: } 
. . . . . . . . . . . .


Create php.ini file from copying the php production file template
root@test:~ # cp /usr/local/etc/php.ini-production /usr/local/etc/php.ini

Configure php.ini
root@test:~ # ee /usr/local/etc/php.ini

672: post_max_size = 10M
776: cgi.fix_pathinfo=0
825: upload_max_filesize = 10M
939: date.timezone = "Australia/Melbourne"

Enable PHP-FPM to start on boot
root@test:~ # sysrc php_fpm_enable="yes"

Start the PHP-FPM Service
root@test:~ # service php-fpm start

Check to see what ports PHP-FPM is listening on
root@test:~ # sockstat -4 -6| grep php-fpm

PHP-FPM Running Success 


Create a php file to check if php works
root@test:~ # echo "<?php phpinfo(); ?>" | tee /usr/local/www/html/phpinfo.php

Restart NGINX
root@test:~ # service nginx restart

Go to http://test/phpinfo.php to check if php script works. 


PHP Page Load Success


Setup HTTPS / SSL / TLS Service


In order to enable the HTTPS service on NGINX, we would need a SSL Certificate and Key. There are more than one way to acquire these certificate and key.

  1. Self-Signed Certificate and Key
  2. Webhosting Provider
  3. Let's Encrypt / Certbot / Acme

Once you have acquired the certificate files, then copy them in the following directory.

Certificate File Name and Location: '/usl/local/etc/ssl/test.crt'
Key File Name and Location: '/usr/local/etc/ssl/test.key'

Certificate and Key File Location


Edit '/usr/local/etc/nginx/nginx.conf' file to define the location of those certificates.
root@test:~ # ee /usr/local/etc/nginx/nginx.conf

. . . . . . . . . . .
 22:  http {
. . . . . . . . . . .
 40:     server {
. . . . . . . . . . .
 84:     } # End of http server block
. . . . . . . . . . .
123:    # HTTPS Server
124:    server {
125:       listen       443 ssl;
126:       server_name  test;
127:
128:        ssl_certificate      /usr/local/etc/ssl/test.crt;
129:        ssl_certificate_key  /usr/local/etc/ssl/test.key;
130
131:        ssl_session_cache    shared:SSL:1m;
132:        ssl_session_timeout  5m;
133:
134:        ssl_ciphers  HIGH:!aNULL:!MD5;
135:        ssl_prefer_server_ciphers  on;
136:
137:        root   /usr/local/www/html;
138:
139:        location / {
140:            index  index.php index.html index.htm;
141:        }
142:
143:        location ~ \.php$ {
144:            fastcgi_param HTTPS on;
145:            fastcgi_pass   127.0.0.1:9000;
146:            fastcgi_index  index.php;
147:            fastcgi_param  SCRIPT_FILENAME $request_filename;
148:            include        fastcgi_params;
149:        }
150:    } # End of https server block
. . . . . . . . . . .
153:} # End of http block
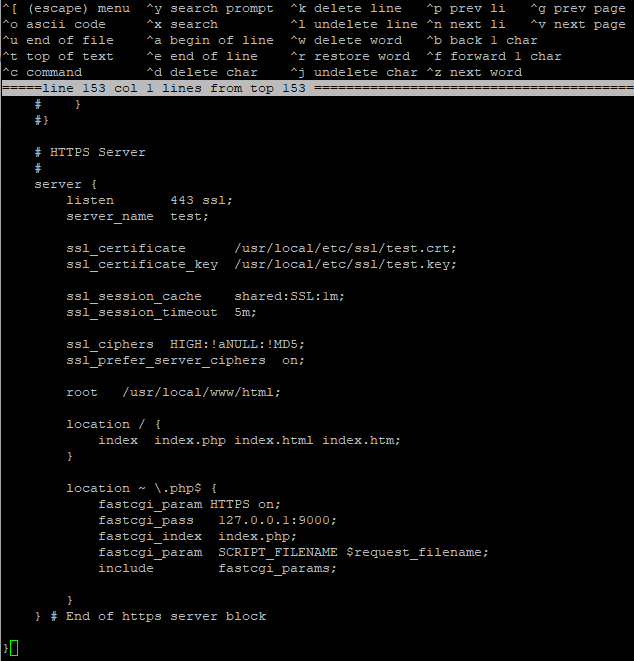

HTTPS Server Block


Restart NGINX and PHP-FPM Service
root@test:~ # service nginx restart ; service php-fpm restart

Go to https://test/phpinfo.php to check if the certificate work.


Certificate works


Observations


When using Self-Signed Certificates, make sure your Internet browser recognises the Certificate Authority that issued the certificate and key.


Helpful Commands


Check NGINX configuration settings and syntax
root@test:~# nginx -t


Resource Links


Sunday, 30 October 2016

How to install and configure Certbot in a FreeNAS Jail

بسم الله الرحمن الرحيم


Abstract


  • A tutorial to install and configure certbot within a FreeNAS Jail.
  • Certbot is 'Electronic Frontier Foundation's ' implementation to issue free automated SSL certificates for webservers that are recognised by popular web browsers.  


Assumptions and Prerequisites


  • Domain: example.com
  • Hostname: www.example.com
  • OS: FreeNAS 9.10.1-U2 (FreeBSD 10.3-STABLE)
  • Container: Warden Jail
  • Jail Name: www
  • Private IP: 10.0.0.56
  • Subnet Mask: 255.255.255.0/24
  • Certbot Version: 0.9.3
  • Apache has already been installed.
  • Apache Version: 2.4.23
  • Apache Webroot directory: /usr/local/www/apache24/data
  • SSL Certificate File: /usr/local/etc/letsencrypt/live/www.example.com/fullchain.pem
  • SSL Key File: /usr/local/etc/letsencrypt/live/www.example.com/privkey.pem 
  • Apache is bound to port 80 and 443.
  • Port 80 and 443 forwarding is enabled on the router to allow access to Apache webserver from the Internet.
  • Email: info@example.com (required to recover lost account details from certbot).


Instructions


- Install certbot
# pkg install py27-certbot

- Configure domain
# certbot certonly
Follow installer instructions
    domain: www.example.com
    webroot: /usr/local/www/apache24/data
    email: info@example.com

- Test certs renewal
# certbot renew --dry-run 

- Renew certs (Renews certs on port 80 for 90 days. Will not renew cert if expiry date of cert is less than 30 days).
# certbot renew --quiet

-  Force cert renewal with current issue date
# certbot renew --quiet --force-renewal

- Renew cert with a higher rsa-key size 4096
# certbot renew --quiet --rsa-key-size 4096 

-  Force cert renewal on https port 443 with a higher rsa-key size 4096
# certbot renew --quiet --rsa-key-size 4096 --force-renewal --tls-sni-01-port 443

- Change SSL Cert file paths in Apache to point to the new location of certbot's certificates
# vi /usr/local/etc/apache24/extra/httpd-ssl.conf
   (144)  SSLCertificateFile "/usr/local/etc/letsencrypt/live/www.example.com/fullchain.pem"
   (154)  SSLCertificateKeyFile "/usr/local/etc/letsencrypt/live/www.example.com/privkey.pem"
   (175)  #SSLCACertificateFile "/usr/local/etc/ssl/certs/ca.pem"

- Reload Apache config after certs renewal
# apachectl -k graceful

- Setup a cron job in FreeNAS to auto renew certs and reload the new apache settings with the following command.
# jexec www certbot renew --quiet --rsa-key-size 4096 && jexec www apachectl -k graceful

- Test the new SSL certs at the SSLABS website. This should give you an A+ on the SSL report.

- Links


Friday, 28 October 2016

How to install a secure Wordpress CMS in a FreeNAS Jail

بسم الله الرحمن الرحيم


Abstract 


A tutorial to install a secure Wordpress CMS on a FreeNAS 9.10.1 Jail.


Assumptions and Prerequisites


  • Domain: example.com
  • Hostname: www.example.com
  • OS: FreeNAS 9.10.1-U2 (FreeBSD 10.3-STABLE)
  • Container: Warden Jail
  • Jail Name: www
  • Private IP: 10.0.0.56
  • Subnet Mask: 255.255.255.0/24
  • Database Server Name: db.example.com
  • Database Type and Version: MariaDB v10.1.18
  • Database Server IP: 10.0.0.57
  • Database Username: n7if835 (random generated)
  • Database Password: TunTeR3MPzqHy1KD (should be randomly generated)
  • Database Name: n7if835 (random generated)
  • Database Table Prefix: 24686nj9po7_ (should be randomly generated)
  • Database Server has SSL configured and enabled.
  • Apache has already been installed.
  • php56 and the necessary extensions are already installed.
  • Apache Webroot directory: /usr/local/www/apache24/data/
  • Apache 'AllowOverride' set to 'All'
  • Wordpress Version: 4.6.1


Instructions


Environment Setup

- Create a database 'n7if835' with username 'n7if835' with all privileges (Data, Structure, and Administration) and password 'TunTeR3MPzqHy1KD'

- Enable mod_rewrite module in apache by editing the file /usr/local/etc/apache24/httpd.conf
# vi /usr/local/etc/apache24/httpd.conf
   (177)   LoadModule rewrite_module libexec/apache24/mod_rewrite.so

- Install package wget to download wordpress archive
# pkg install wget

Install and Configure Wordpress

- Download wordpress from http://wordpress.org/latest.tar.gz
# cd /tmp
# wget http://wordpress.org/latest.tar.gz
- Unzip archive /tmp/latest.tar.gz
# tar xvf latest.tar.gz

- Copy /tmp/wordpress/ contents to webroot directory /usr/local/www/apache24/data/
# cp -Rfv /tmp/wordpress/* /usr/local/www/apache24/data/

- Goto https://www.example.com/ via web browser and follow the installation instructions.

- Enter the following Database details:
        Database Name: n7if835
        Username: n7if835
        Password: TunTeR3MPzqHy1KD
        Database Host: db.example.com
        Table Prefix: 24686nj9po7_

- Copy the generated code by wordpress installer into the file /usr/local/www/apache24/data/wp-config.php
# vi /usr/local/www/apache24/data/wp-config.php

- Click on the 'Run the Install' button and that will create the necessary database tables.

- Enter the following Site details:
        Site Title: www.exampl.com
        Username: webmin2001 (for security reasons don't use anything like 'admin')
        Password: (Enter strong password)
        Your Email: (your email address for this wordpress admin account)

- Enable Direct File System access by wordpress
# chmod -Rv 775 /usr/local/www/apache24/data/wp-content
- Edit file /usr/local/www/apache24/data/wp-config.php
# vi /usr/local/www/apache24/data/wp-config.php
   (40)    /** If you don't want to use FTP to add/delete/update plugins/themes then define this option. **/
   (41)    define('FS_METHOD','direct');

- Test by deleting and adding a plugin or theme.

Securing Wordpress

- Enable DB SSL Connection by Wordpress
Edit File /usr/local/www/apache24/data/wp-config.php
# vi /usr/local/www/apache24/data/wp-config.php
   (43)    /** Force Wordpress to use SSL connection to Database **/
   (44)    define('MYSQL_CLIENT_FLAGS', MYSQL_CLIENT_SSL);

- Goto https://www.example.com/phpmyadmin via web browser and change the following details:
           Username: n7if835 SSL setting from 'REQUIRE NONE' to 'REQUIRE SSL'.
           Remove Administration Privileges for user n7if835

- Disable file editing for editing plugins and themes.
Edit file /usr/local/www/apache24/data/wp-config.php
# vi /usr/local/www/apache24/data/wp-config.php
   (46)    /** Disable File Editing **/
   (47)    define('DISALLOW_FILE_EDIT', true);

- Force SSL Logins and SSL Admin Access
# vi /usr/local/www/apache24/data/wp-config.php
   (49)    /** Force SSL Logins **/
   (50)    define('FORCE_SSL_LOGIN', true);
   (51)
   (52)    /** Force SSL Admin Access **/
   (53)    define('FORCE_SSL_ADMIN', true);

- Delete files 'license.txt' and 'readme.html' in the wordpress root directory and also 'install.php' in wp-admin directory because they are possible site security holes.
# rm -v /usr/local/www/apache24/data/license.txt 
# rm -v /usr/local/www/apache24/data/readme.html
# rm -v /usr/local/www/apache24/data/wp-admin/install.php

- Make the file /usr/local/www/apache24/data/wp-config.php only readable by user and group
# chmod 440 /usr/local/www/apache24/data/wp-config.php

- Move the file /usr/local/www/apache24/data/wp-config.php up one directory to prevent web users access.
# mv /usr/local/www/apache24/data/wp-config.php /usr/local/www/apache24/wp-config.php

- Disable php functions that are not needed (good practice if website is on a shared host).
# vi /usr/local/etc/php.ini
    (303)  disable_functions = exec,passthru,shell_exec,system,proc_open,popen,curl_exec,curl_multi_exec,parse_ini_file,show_source

- Turn off expose_php in php.ini
# vi /usr/local/etc/php.ini
    (363)  expose_php = Off

- Disable opening urls as files
# vi /usr/local/etc/php.ini
    (831)  allow_url_fopen = Off

- Create .htaccess file in the wordpress root directory and write the following to prevent web directory browsing, user enumeration, includes directory access, hotlinking of images, and users from reading the wp-config file.
# vi /usr/local/www/apache24/data/.htaccess
    (1)    Options -Indexes +FollowSymLinks
    (2)  
    (3)    <IfModule mod_rewrite.c>
    (4)    RewriteEngine On
    (5)    RewriteBase /
    (6)
    (7)    # Enable Permalinks to work
    (8)    RewriteRule ^index\.php$ - [L]
    (9)    RewriteCond %{REQUEST_FILENAME} !-f
    (10)   RewriteCond %{REQUEST_FILENAME} !-d
    (11)   RewriteRule . /index.php [L]
    (12)
    (14)   # Prevent user enumeration
    (15)   RewriteCond %{QUERY_STRING} ^author=([0-9]*)
    (16)   RewriteRule .* https://www.example.com/? [L,R=302]
    (17)   RewriteRule ^wp-admin/includes/ - [F,L]
    (18)
    (19)   # Prevent includes directory access
    (20)   RewriteRule !^wp-includes/ - [S=3]
    (21)   RewriteRule ^wp-includes/[^/]+\.php$ - [F,L]
    (22)   RewriteRule ^wp-includes/js/tinymce/langs/.+\.php - [F,L]
    (23)   RewriteRule ^wp-includes/theme-compat/ - [F,L]
    (24)
    (25)   # Disable hotlinking of images with forbidden or custom image option
    (26)   RewriteCond %{HTTP_REFERER} !^$
    (27)   RewriteCond %{HTTP_REFERER} !^http(s)?://(www\.)?example.com [NC]
    (28)   RewriteCond %{HTTP_REFERER} !^http(s)?://(www\.)?google.com [NC]
    (29)   RewriteCond %{HTTP_REFERER} !^http(s)?://(www\.)?feeds2.feedburner.com/example [NC]
    (30)   RewriteRule \.(jpg|jpeg|png|gif)$ – [NC,F,L]
    (31)
    (32)   # Disable XMLRPC
    (33)   RewriteRule ^xmlrpc.php$ "http://0.0.0.0/" [R=301,L]
    (34)
    (35)   # Restrict access to plugins and themes php files from unauthorised users
    (36)   RewriteCond %{REQUEST_URI} !^/wp-content/plugins/file/to/exclude\.php
    (37)   RewriteCond %{REQUEST_URI} !^/wp-content/plugins/directory/to/exclude/
    (38)   RewriteRule wp-content/plugins/(.*\.php)$ - [R=404,L]
    (39)   RewriteCond %{REQUEST_URI} !^/wp-content/themes/file/to/exclude\.php
    (40)   RewriteCond %{REQUEST_URI} !^/wp-content/themes/directory/to/exclude/
    (41)   RewriteRule wp-content/themes/(.*\.php)$ - [R=404,L]
    (42)
    (43)   # Prevent Script injections
    (44)   RewriteCond %{QUERY_STRING} (<|%3C).*script.*(>|%3E) [NC,OR]
    (45)   RewriteCond %{QUERY_STRING} GLOBALS(=|[|%[0-9A-Z]{0,2}) [OR]
    (46)   RewriteCond %{QUERY_STRING} _REQUEST(=|[|%[0-9A-Z]{0,2})
    (47)   RewriteRule ^(.*)$ index.php [F,L]
    (48)   </IfModule>
    (49)
    (50)   # Protect wp-config.php from user access
    (51)   <files wp-config.php>
    (52)   Require all denied
    (53)   </files>

- Prevent execution of php scripts in the uploads directory
# vi /usr/local/www/apache24/data/wp-content/uploads/.htaccess
    (1)    # Disable php file execution
    (2)    <files *.php>
    (3)    Require all denied
    (4)    </files>

Thursday, 27 October 2016

How to Install Apache webserver in a FreeNAS Jail

بسم الله الرحمن الرحيم


Abstract


  • A tutorial to install the Apache webserver in FreeNAS 9.10 Jail.
  • Configure and enable SSL on Apache.
  • Enable Virtual Hosts.
  • Enable and configure Apache Server Pool Management.
  • Configure Apache to run CGI and Perl scripts. 
  • Install and configure php56. 


Assumptions and Prerequisites


  • Domain: example.com
  • Hostname: www.example.com
  • System Notification Email: info@example.com 
  • OS: FreeNAS 9.10.1-U2 (FreeBSD 10.3-STABLE)
  • Container: Warden Jail
  • Jail Name: www
  • Private IP: 10.0.0.56
  • Subnet Mask: 255.255.255.0/24
  • Server Location: Melbourne, Australia
  • Webserver and Version: Apache v2.4.23_1
  • Apache Document Root Directory: /usr/local/www/apache24/data
  • Apache MPM: Prefork Module
  • Disable Directory Browsing.
  • Allow Over Ride All to .htaccess files.
  • CA Certificate File: /usr/local/etc/ssl/certs/ca.pem
  • SSL Certificate File: /usr/local/etc/ssl/certs/www.example.com.crt
  • SSL Key File: /usr/local/etc/ssl/private/www.example.com.key


Instructions


- Install Apache2.4
# pkg install apache24

- Configure Apache settings
Edit file /usr/local/etc/apache24/httpd.conf
# vi /usr/local/etc/apache24/httpd.conf
   (214) ServerAdmin info@example.com
   (222) ServerName www.example.com
   (260) Options -Indexes +FollowSymLinks
   (267) AllowOverride All

- Set Server Defaults for Production Server
Edit /usr/local/etc/apache24/httpd.conf
# vi /usr/local/etc/apache24/httpd.conf
   (505) Include etc/apache24/extra/httpd-default.conf
Edit /usr/local/etc/apache24/extra/httpd-default.conf
# vi /usr/local/etc/apache24/extra/httpd-default.conf
   (55)  ServerTokens Prod

Enable apache to run and start on boot.
# sysrc apache24_enable="yes"
Start Apache Server
# service apache24 start

- Generate Self-Signed Certificate Authority, Server Certificate and Key.

Enable SSL 

Edit /usr/local/etc/apache24/httpd.conf
# vi /usr/local/etc/apache24/httpd.conf
   (89)   LoadModule socache_shmcb_module libexec/apache24/mod_socache_shmcb.so
   (144)  LoadModule ssl_module libexec/apache24/mod_ssl.so
   (513)  Include etc/apache24/extra/httpd-ssl.conf
Edit /usr/local/etc/apache24/extra/httpd-ssl.conf
# vi /usr/local/etc/apache24/extra/httpd-ssl.conf
   (52)   #SSLCipherSuite HIGH:MEDIUM:!MD5:!RC4
   (53)   #SSLProxyCipherSuite HIGH:MEDIUM:!MD5:!RC4
   (65)   SSLCipherSuite HIGH:MEDIUM:!SSLv3:!kRSA
   (66)   SSLProxyCipherSuite HIGH:MEDIUM:!SSLv3:!kRSA
   (124)  DocumentRoot "/usr/local/www/apache24/data"
   (125)  ServerName www.example.com:443
   (126)  ServerAdmin info@example.com
   (127)  ErrorLog "/var/log/httpd-error.log"
   (128)  TransferLog "/var/log/httpd-access.log"
   (144)  SSLCertificateFile "/ust/local/etc/ssl/certs/www.example.com.crt"
   (154)  SSLCertificateKeyFile "/usr/local/etc/ssl/certs/www.example.com.key"
   (175)  SSLCACertificateFile "/usr/local/etc/ssl/certs/ca.pem"
Reload new settings for Apache
# service apache24 graceful

Enable Virtual Hosts

- Enable Virtualhosts to redirect traffic from unecrypted port (80) to encrypted port (443).
Edit /usr/local/etc/apache24/httpd.conf
# vi /usr/local/etc/apache24/httpd.conf
   (496)  Include etc/apache24/extra/httpd-vhosts.conf
Edit /usr/local/etc/apache24/extra/httpd-vhosts.conf
# vi /usr/local/etc/apache24/extra/httpd-vhosts.conf
   (23)  
   (24)       ServerAdmin info@example.com
   (25)       DocumentRoot "/usr/local/www/apache24/data"
   (26)       ServerName www.example.com
   (27)       ServerAlias www.example.com
   (28)       ErrorLog "/var/log/www.example.com-error_log"
   (29)       CustomLog "/var/log/www.example.com-access_log" common
   (30)       Redirect "/" "https://www.example.com"
   (31)  
Reload new settings for Apache
# service apache24 graceful


Enable Server Pool Management

Edit /usr/local/etc/apache24/httpd.conf
# vi /usr/local/etc/apache24/httpd.conf
   (478)  Include etc/apache24/extra/httpd-mpm.conf
Change the number of concurrent connections for the server from 250 to 50 by editing the /usr/local/etc/apache24/extra/httpd-mpm.conf file
# vi /usr/local/etc/apache24/extra/httpd-mpm.conf
   (32)    MaxRequestWorkers      50
Reload new settings for Apache
# service apache24 graceful

Enable CGI and Perl Scripts


Edit /usr/local/etc/apache24/httpd.conf
# vi /usr/local/etc/apache24/httpd.conf
   (162)   LoadModule cgid_module libexec/apache24/mod_cgid.so
   (165)   LoadModule cgi_module libexec/apache24/mod_cgi.so
   (260)   Options -Indexes +FollowSymLinks +ExecCGI
   (418)   AddHandler cgi-script .cgi .pl
Reload new settings for Apache
# service apache24 graceful

- Create CGI Script to test on Server
Create file /usr/local/www/apache24/data/index.cgi
#vi /usr/local/www/apache24/data/index.cgi
   (1)     #!/usr/local/bin/perl
   (2)     print "Content-type: text/html\n\n";
   (3)     print "<html>\n<body>\n";
   (4)     print "<div style=\"width: 100%; font-size: 40px; font-weight: bold; text-align: center;\">\n";
   (5)     print "CGI Test Page";
   (6)     print "\n</div>\n";
   (7)     print "</body>\n</html>\n";
Change Permissions of file
# chmod 705 /usr/local/www/apache24/data/index.cgi
- Test Script in Browser

- Create Perl Script to test on Server
Create file /usr/local/www/apache24/data/index.pl
#vi /usr/local/www/apache24/data/index.pl
   (1)     #!/usr/local/bin/perl
   (2)     print "Content-type: text/html\n\n";
   (3)     print "<html>\n<body>\n";
   (4)     print "<div style=\"width: 100%; font-size: 40px; font-weight: bold; text-align: center;\">\n";
   (5)     print "Perl Test Page";
   (6)     print "\n</div>\n";
   (7)     print "</body>\n</html>\n";
- Change Permissions of file
# chmod 705 /usr/local/www/apache24/data/index.pl
- Test Script in Browser

Install and Enable  php56

# pkg install -y php56 mod_php56 php56-mysql php56-mysqli php56-extensions
Create file php56 configuration file /usr/local/etc/apache24/includes/php56.conf
# vi /usr/local/etc/apache24/includes/php56.conf
   (1)     <FilesMatch "\.php$">
   (2)         SetHandler application/x-httpd-php
   (3)     </FilesMatch>
   (4)     <FilesMatch "\.phps$">
   (5)         SetHandler application/x-httpd-php-source
   (6)     </FilesMatch>
Reload new settings for Apache
# service apache24 graceful

- Change script preference to execute index.php over index.html
Edit /usr/local/etc/apache24/httpd.conf
# vi /usr/local/etc/apache24/httpd.conf
   (281)  DirectoryIndex index.php index.html
- Copy php.ini-production to php.ini
# cp /usr/local/etc/php.ini-production /usr/local/etc/php.ini
- Edit file /usr/local/etc/php.ini
# vi /usr/local/etc/php.ini
   (936)   date.timezone = "Australia\Melbourne"
Reload new settings for Apache
# service apache24 graceful

- Create php Script to test on Server
Create file /usr/local/www/apache24/data/index.php
# vi /usr/local/www/apache24/data/index.php
   (1)       <html>
   (2)       <body>
   (3)       <div style="width: 100%; font-size: 40px; font-weight: bold; text-align: center;">
   (4)       <?php
   (5)            print Date("Y/m/d");
   (6)       ?>
   (7)       </div>
   (8)       </body>
   (9)       </html>
- Test Script in Browser

- Links

Saturday, 21 November 2009

Web Design Update

After 3 years of reading up on web designing, particularly PHP and PEAR, I have finally stumbled on somthing known as Model-View-Controller (MVC) paradigm. I always felt web designing seemed a whole lot chaotic and unstructured.

Now, thanks to the MVC methodology and a good PHP framework like Yii, I have managed to develop the basic structure of my web application/site with the basic login processing.

Although, there are many PHP frameworks out there such as Akelos and CakePhp, but I found the Yii well documented for beginners. So, after I got the blog tutorial to work, I sat down to design the whole database schema of my application before I go on further. I'm only got it done half which is enough for now.

Right now, the website only exist on my local development machine. I've been configuring and reconfiguring my production machine since the web hoster did their upgrade, which messed up everything for me. I just can't get to change my [include_path]. I contacted tech support and the genius on the other end had no clue what the hell she was doing. But, I've managed to find a way around the problem. Although, it would make my life easier if I can edit the [include_path].

Friday, 14 August 2009

Web Development Update

Alrighty then! I figured out what I was doing wrong with the sessions in php. It turns out I have to use the 'session_start()' function on every php page, even if when the page is redirected to another php page.

Tuesday, 4 August 2009

Another Web Development Setback

I tried to create a Session variable in PHP and it didn't work. The variable was created but I wasn't able to retrieve it after a page redirection. For the life of me I can't understand why it didn't work. I've crossed checked the documentation for it and everything seems to be fine but it still doesn't work.....? Anyway, back to the drawing board.

Wednesday, 29 July 2009

WAMP Installation Currupted

The WAMP installation on my Dev Machine crashed for some reason I don't know what? It took me an hour to restore it. It's setbacks like these that frustrate the hell out of me. I haven't quiet begun to design my website and my development environment keeps messing up.

I've been reading a lot of PEAR documentation lately. It's been over a week and I haven't exactly started the coding process. This web designing thing is so time consuming. And It doesn't help when your the only one on the project. If only I could find some qualified Web Designer to help me.

Is there a helping soul out there?!

Tuesday, 21 July 2009

Development Machine Setup

Finally, got my development machine installed and configured. Took me a whole afternoon. It takes so long because of the Internet searches for all the 'How Tos'. The Dev Machine's configuration is 'Windows XP Pro', Apache, Mysql, PHP, PEAR, and Smarty (WAMP).

Now, all I gotta figure out is how to set up a local PEAR installation on a shared UNIX (FreeBSD) web host. I took a whack at it and turned out to be a fruitless effort as of yet. I'll take another swipe at it sometime later.

For those of you who want to subscribe to a great web hosting service then you should check out http://www.aplus.net/. Subscribing to any other web hosting service is just a waste of money and most people I've talked to who have a website are paying ridiculous amounts for a crappy web hosting service.

Friday, 17 July 2009

Website Update

Submitted a request to my web hoster for SSH access. They wanted a photo ID so I gave them my old expired Alabama Learner's permit. Hope that works. Its been more than 2 days since I gave them my photo ID. Wonder whats taking them so long. Come to think of it, I could've just scanned my passport and that would've worked as well. Why the hell didn't I do that in the first place?!!

Speaking of photo IDs, I just realized that I don't have a proper Australian Photo ID other than my Indian Passport. And I don't wanna risk carrying my passport around with me all the time. I was going to apply for a Victorian Learners Permit as a means of Identification, but then I found out theres a whole lot of procedures involved for a person with a disability to acquire one. Such as a rehab assessment by a rehab specialist. So, that plan got shot to hell. The next best thing left is to apply for a 'proof of age' card which can be used as an official form of ID. At least that's what I've been told. So, that's what I'm gonna do then.

I unregistered the http://www.obdeus.com/ domain name because it sounds dumb and it didn't exactly mean "in front of god" in Latin. So, now its just http://www.mujahidjaleel.com/.

Thursday, 16 July 2009

Website

The whole idea of designing a website is still pending even after 3 years since the last time I mentioned it. I even upgraded my web hosting plan to a 200GB web space and what not and still no real progress.

I need professional help and time to design something. If I can only design something so that I can list this in my resume under the Project Portfolio section then I might be able to score a real IT job and none of that level 1 tech support shit!

Dear reader, consider this blog entry an official cry for professional help!

Thursday, 22 June 2006

A New Beginning

Exams ended on 15th June and since then I got myself busy with all sorts of things that I wanted to do for a long time. Like the last term break, I made a “Things to do” list so that I don’t forget the million things I plan to do before my next and last term starts; guess what? Making this blog entry was on that list. The next term starts on 7th July by the way.

I have finally achieved something that I was trying to do for the last 4 years and I feel I have climbed a mountain. It might not seem big or important for someone else but, to me it is a major mile stone of my life. I have finally registered a web domain and host for my website. It is www.mujahidjaleel.com for now then I’ll add a secondary domain name www.obdeus.com which means “in front of god” in Latin. I’m still pondering over other variations of the same word but, I think it is most definitely going to be “Obdeus”.

O man, there are so many things to do before the 7th. Mostly a lot of reading is involved because of the web designing related stuff I have to catch up on. Since, my web hosting plan is unix based, I have to design everything in php and mysql. Anyway, I never designed a website with a back end support and this is my big chance to learn and design something great. This website would be my place in cyberspace where I can do anything my mind tells me to do. Heck I can even open my own ecommerce store on it and sell anything I want. Anyway, I have huge plans for this investment.