بسم الله الرحمن الرحيم
Abstract
Tutorial on how to setup NGINX Web Server with PHP72 in an iocage Jail on FreeNAS 11.1.
Assumptions and Prerequisites
- OS: FreeNAS 11.1-U6
- FreeNAS Host: fn
- FreeNAS Network Interface: igb0
- FreeNAS IP: 10.0.0.2
- FreeNAS Subnet Mask: 24
- Jail Container: iocage
- iocage Version: 1.0 Alpha
- Jail Release: 11.1-RELEASE
- Jail Name: test
- Jail Network Interface: vnet0
- Jail Network Config: DHCP
- Jail Default Route: 10.0.0.1
- IP Version: IPv4
- Bridge Network Interface: bridge0
- DNS 1: 10.0.0.1
- Domain: example.com
- ZPool Volume: tank
- NGINX Version: 1.14.0_12
- Web Directory: /usr/local/www/html
- PHP Version: 7.2
- Certificate File Name and Location: /usl/local/etc/ssl/test.crt
- Certificate Key File Name and Location: /usr/local/etc/ssl/test.key
- Setup iocage Jail
NGINX
Install NGINX
root@test:~ # pkg install nginx
 |
| Install Output |
Enable NGINX to start on boot
root@test:~ # sysrc nginx_enable="yes"
Start NGINX Server
root@test:~ # service nginx start
Check to see what ports NGINX is listening on
root@test:~ # sockstat -4 -6 | grep nginx
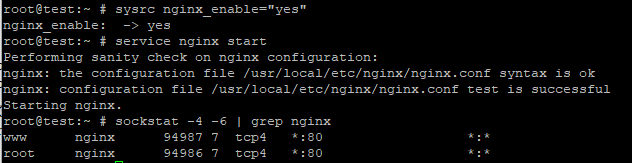 |
| NGINX Running Success |
 |
| NGINX Loads Default Page |
PHP72
Install PHP72
root@test:~ # pkg install php72 php72-extensions
Create Web Directory
root@test:~ # mkdir -p /usr/local/www/html
Edit NGINX main configuration file to set php as server side script
root@test:~ # ee /usr/local/etc/nginx/nginx.conf
. . . . . . . . . . . .
02: user www;
. . . . . . . . . . . .
. . . . . . . . . . . .
42: server_name test;
. . . . . . . . . . . .
. . . . . . . . . . . .
49: root /usr/local/www/html;
50: index index.php index.html index.htm;
. . . . . . . . . . . .
. . . . . . . . . . . .
70: location ~ \.php$ {
71: root /usr/local/www/html;
72: fastcgi_pass 127.0.0.1:9000;
73: fastcgi_index index.php;
74: fastcgi_param SCRIPT_FILENAME $request_filename;
75: include fastcgi_params;
76: }
. . . . . . . . . . . .
. . . . . . . . . . . .
Create php.ini file from copying the php production file template
root@test:~ # cp /usr/local/etc/php.ini-production /usr/local/etc/php.ini
Configure php.ini
root@test:~ # ee /usr/local/etc/php.ini
672: post_max_size = 10M
776: cgi.fix_pathinfo=0
825: upload_max_filesize = 10M
939: date.timezone = "Australia/Melbourne"
Enable PHP-FPM to start on boot
root@test:~ # sysrc php_fpm_enable="yes"
Start the PHP-FPM Service
root@test:~ # service php-fpm start
Check to see what ports PHP-FPM is listening on
root@test:~ # sockstat -4 -6| grep php-fpm
 |
| PHP-FPM Running Success |
Create a php file to check if php works
root@test:~ # echo "<?php phpinfo(); ?>" | tee /usr/local/www/html/phpinfo.php
Restart NGINX
root@test:~ # service nginx restart
Go to http://test/phpinfo.php to check if php script works.
 |
| PHP Page Load Success |
Setup HTTPS / SSL / TLS Service
In order to enable the HTTPS service on NGINX, we would need a SSL Certificate and Key. There are more than one way to acquire these certificate and key.
- Self-Signed Certificate and Key
- Webhosting Provider
- Let's Encrypt / Certbot / Acme
Once you have acquired the certificate files, then copy them in the following directory.
Certificate File Name and Location: '/usl/local/etc/ssl/test.crt'
Key File Name and Location: '/usr/local/etc/ssl/test.key'
 |
| Certificate and Key File Location |
Edit '/usr/local/etc/nginx/nginx.conf' file to define the location of those certificates.
root@test:~ # ee /usr/local/etc/nginx/nginx.conf
. . . . . . . . . . .
22: http {
. . . . . . . . . . .
40: server {
. . . . . . . . . . .
84: } # End of http server block
. . . . . . . . . . .
123: # HTTPS Server
124: server {
125: listen 443 ssl;
126: server_name test;
127:
128: ssl_certificate /usr/local/etc/ssl/test.crt;
129: ssl_certificate_key /usr/local/etc/ssl/test.key;
130
131: ssl_session_cache shared:SSL:1m;
132: ssl_session_timeout 5m;
133:
134: ssl_ciphers HIGH:!aNULL:!MD5;
135: ssl_prefer_server_ciphers on;
136:
137: root /usr/local/www/html;
138:
139: location / {
140: index index.php index.html index.htm;
141: }
142:
143: location ~ \.php$ {
144: fastcgi_param HTTPS on;
145: fastcgi_pass 127.0.0.1:9000;
146: fastcgi_index index.php;
147: fastcgi_param SCRIPT_FILENAME $request_filename;
148: include fastcgi_params;
149: }
150: } # End of https server block
. . . . . . . . . . .
153:} # End of http block
 |
| HTTPS Server Block |
Restart NGINX and PHP-FPM Service
root@test:~ # service nginx restart ; service php-fpm restart
Go to https://test/phpinfo.php to check if the certificate work.
 |
| Certificate works |
Observations
When using Self-Signed Certificates, make sure your Internet browser recognises the Certificate Authority that issued the certificate and key.
Helpful Commands
Check NGINX configuration settings and syntax
root@test:~# nginx -t
2 comments:
Thanks for this post, it saved me a lot of time. I do have a couple of corrections to suggest.
When editing ngix.conf you have:
71: root /usr/local/www/web;
I believe that should be:
71: root /usr/local/www/html;
Also, you say:
Go to http://test/phpinfo.php/ to check if php script works.
This should be:
Go to http://test/phpinfo.php to check if php script works.
Thank you for the corrections. The post has been updated.
Post a Comment